Need Waterproofing Help? Call: (860) 875-6646
Hidden pipe leaks can cause serious damage to your home if they go unnoticed. Catching the signs early and knowing how to respond makes all the difference in preventing costly repairs. An expert waterproofing team can handle the tough cases, but many homeowners can tackle smaller leaks on their own. This post walks you through spotting the warning signs, locating the leak, shutting off your water, making repairs, and checking for water damage afterward. We'll also cover some tips to prevent future leaks.
The first sign of a hidden leak is often a musty or moldy smell in the air. Watch for unexplained water stains, discoloration, or peeling paint on your walls. A sudden jump in your water bill without any change in usage can also point to a leak you can't see. Pay attention to dripping sounds or running water when no fixtures are on. You might also notice a drop in water pressure. These small clues can tip you off to a problem behind your walls before things get worse.
Start by doing a careful inspection of the affected area. Look for visible signs, such as water stains, mold, or peeling paint, that may indicate where the leak is coming from. Use a stud finder to locate the studs in the wall, since leaks often occur near pipes that run through these areas. Listen for running water or dripping sounds behind the wall to help narrow things down. Feel the wall for damp or cold spots compared to the surrounding area. This can be a strong indicator of water getting through. These steps will help you zero in on where the leak actually is so you can fix it properly.
Before doing anything else, turn off the water supply to prevent further damage. Here's how:
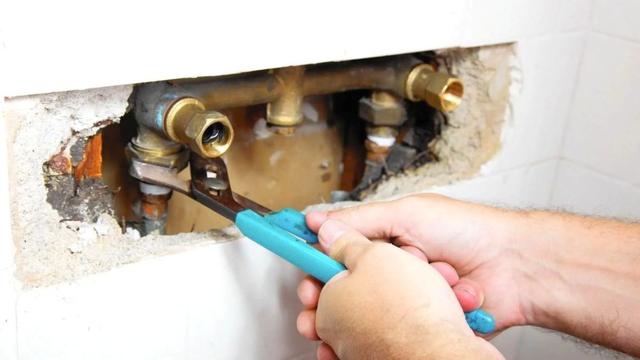
Start by figuring out how severe the leak is and exactly where the damaged pipe is located inside the wall. Once you've got that pinned down, grab your tools: a pipe cutter, a new pipe section, pipe fittings, and a torch. Make sure the main water supply is off before cutting into the wall. Carefully cut out the damaged section of pipe and remove it. Clean up the edges of the remaining pipe and prep it for the new piece. Install the new section using the right fittings and solder them securely into place. When the repair is done, turn the water back on and check for any leaks.
After you've fixed the pipe, take a close look around for water damage. Letting water damage sit can lead to bigger problems down the line. Here's what to check:
Regularly checking your plumbing and fixing any wear or damage right away can help you avoid future leaks inside your walls. Look for rust, corrosion, or water stains on exposed pipes. Make sure all connections are tight, and there's no visible dripping. Think about installing a water leak detection system that alerts you to problems before they get out of hand. Insulate your pipes to prevent freezing in cold weather, since frozen pipes can crack and leak. Skip the harsh chemicals that eat away at pipes and stick to regular maintenance instead. Staying on top of things can save you from dealing with expensive and messy pipe leaks later.
Related Topics: